Gruppo Gimoka S.r.l. |
Integrazione Ebay |
Sul pannello Admin Caffe |
Luca Morselli 17/06/2021 |  |

Sommario
PRE-REQUISTI
Developer Account Ebay
Ovviamente bisogna avere le credenziali e gli accessi ad un Developer account di Ebay.
Link: https://developer.ebay.com/
Vedi documentazione:
https://developer.ebay.com/api-docs/static/creating-edp-account.html
L’account Developer è quello che può usare ed eseguire le API. L’account Developer deve essere autorizzato da un account Ebay Seller per visualizzare i suoi contenuti ( offerte, inventory, etc, etc ).
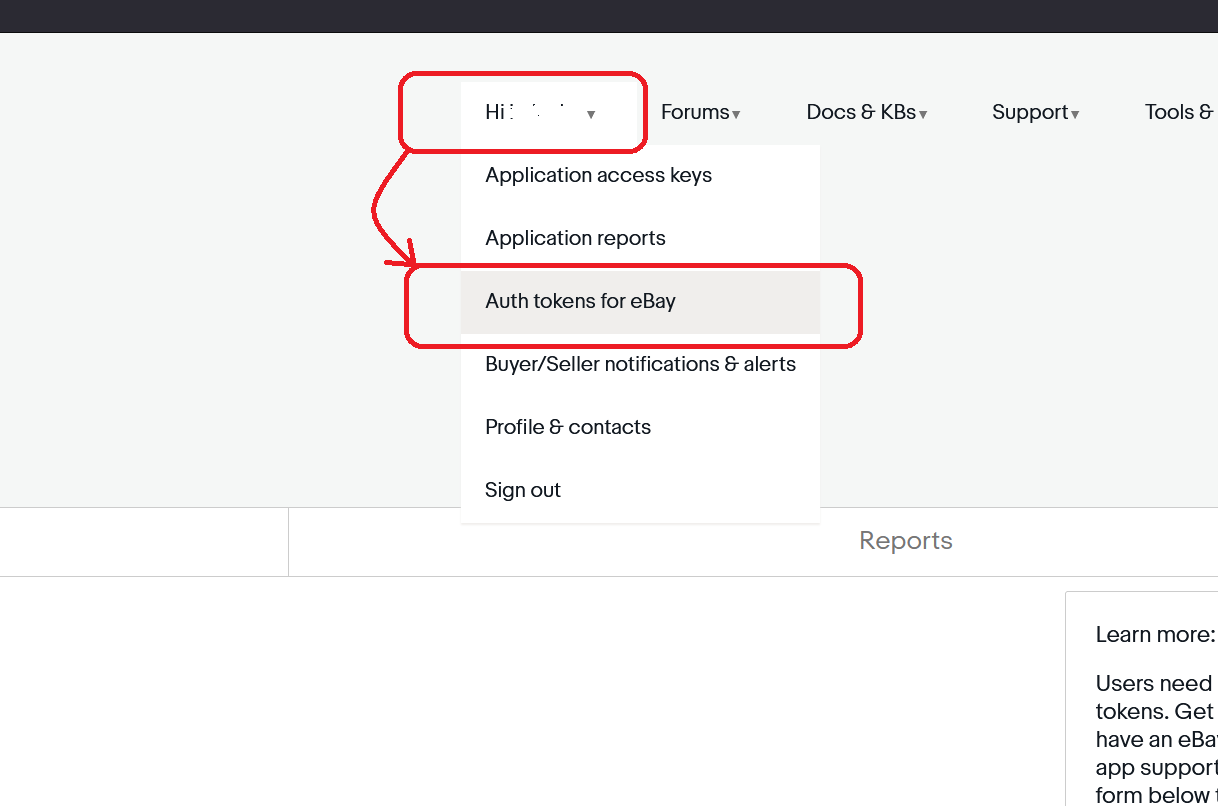
Una volta entrato nell’account Developer Ebay andare al menu:
Home -> Auth tokens for eBay
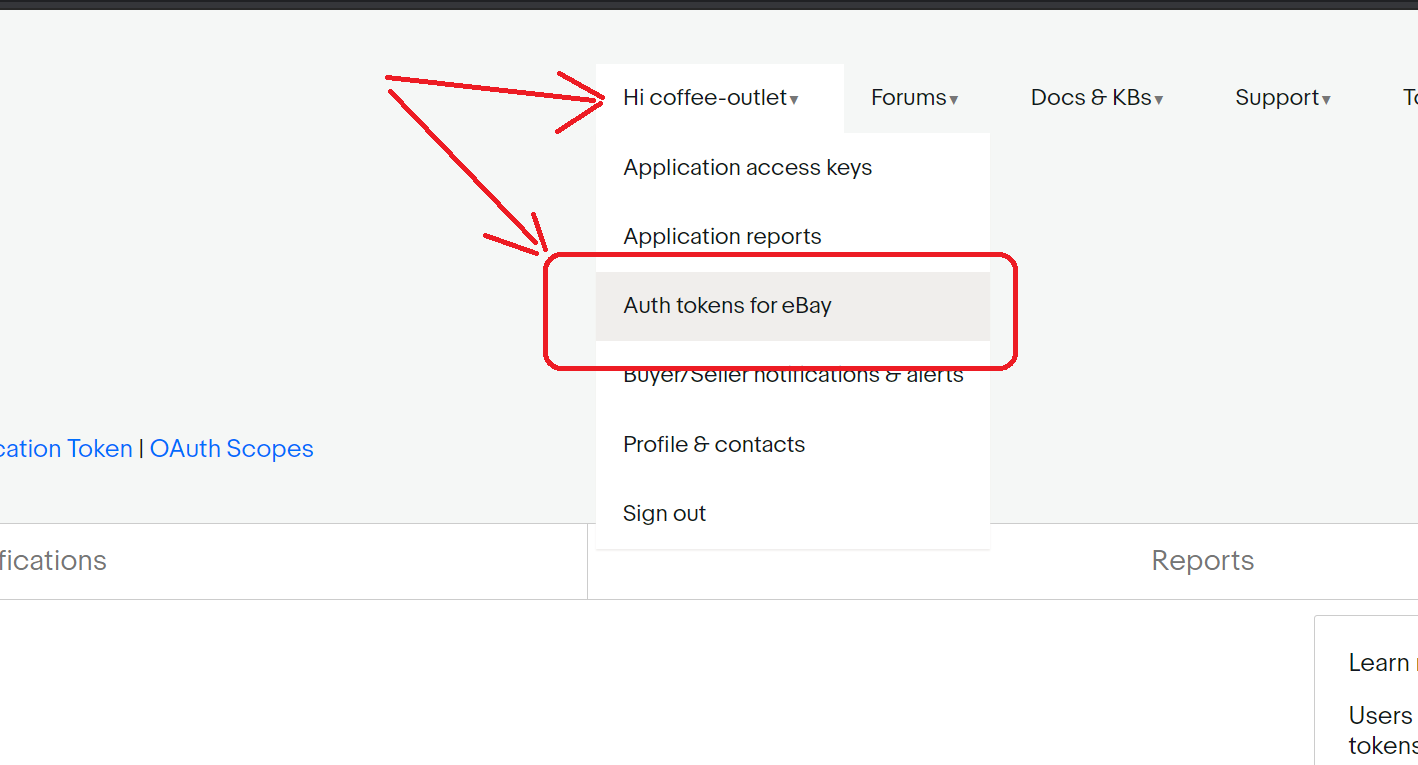
Dopo avere selezionato il menu apparirà sulla sinistra:
Home -> User Tokens (eBay Sign-In)
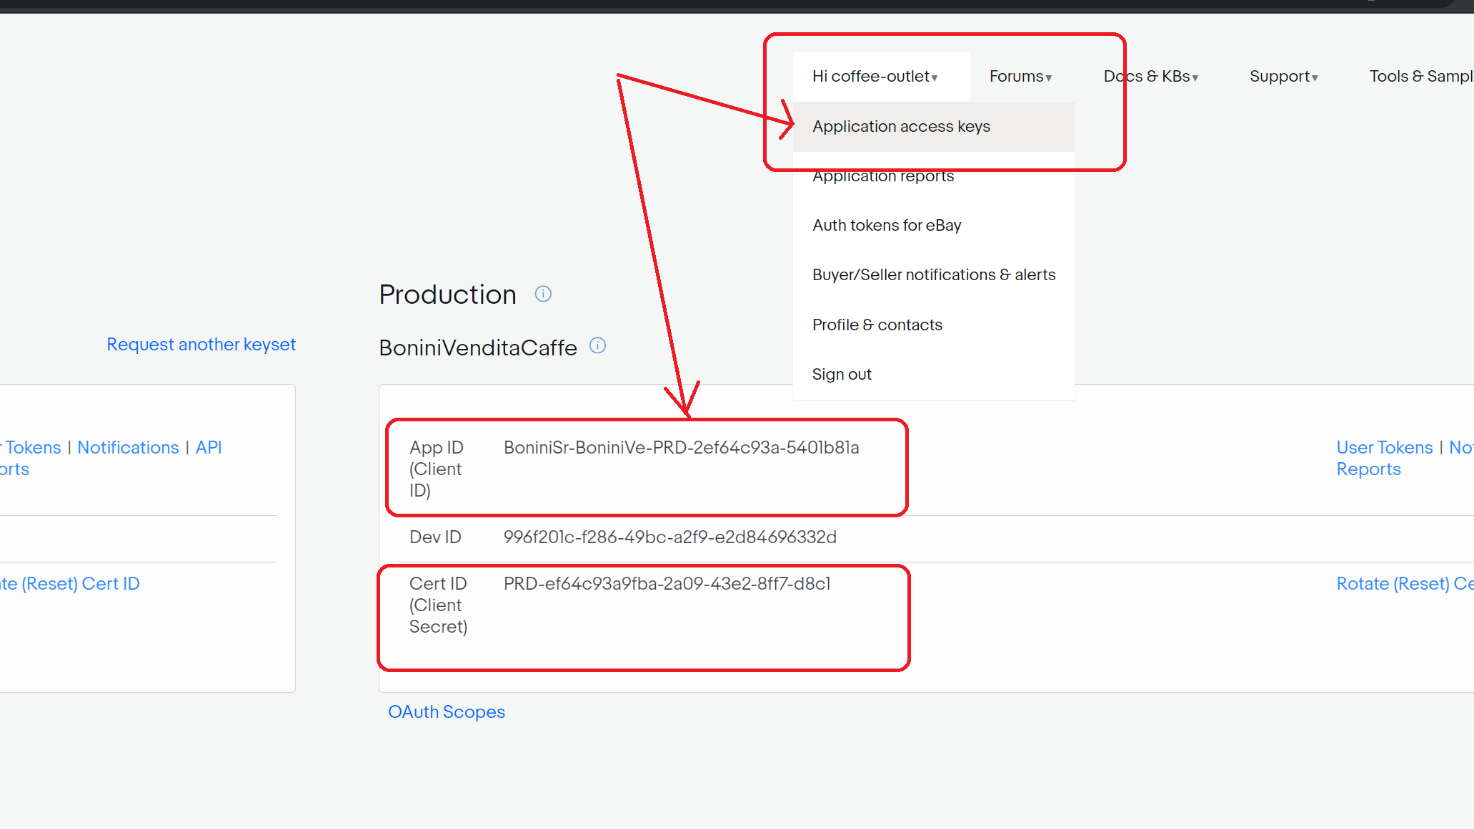
Per potere eseguire le API sono necessari i due parametri “Client_ID” e “Client_Secret” che servono ad Ebay per individuare il Developer. Per visualizzare cliccare su “Home” -> “Application access Keys” come da figura
Seller Account Ebay
Bisogna essere in possesso anche di un account Seller che mette a disposizione i propri dati. Questo account è quello che deve eseguire il Sign-In per ricevere il “code”, da utilizzare per la richiesta dell’Access Token e relativo Refresh Token. Nel nostro caso account seller ebay è coffee-outlet, legata alla mail ebay@caffebonini.it

STEP PROCESSO INTEGRAZIONE
STEP 1 – Prelevare le credenziali App Developer - Getting your OAuth credentials
Vedi documentazione: https://developer.ebay.com/api-docs/static/oauth-credentials.html
Ricavare le credenziali Developer della App che deve essere autorizzata dall’account Seller Ebay, cosi che possa ricavare i suoi dati.
Per potere eseguire le API e le chiamate necessarie per le richieste di autenticazione, sono necessari i due parametri “Client_ID” e “Client_Secret” che servono ad Ebay per individuare il Developer. Per visualizzare cliccare su “Home” -> “Application access Keys” come da figura

STEP 2 – Creazione eBay Sign-in Settings - Getting your redirect_uri value
Per potere accedere dalle API ai dati del Seller Ebay Account bisogna eseguire un accesso di tipo: authorization code.
Vedi documentazione: https://developer.ebay.com/api-docs/static/oauth-redirect-uri.html
Vedi documentazione: https://developer.ebay.com/api-docs/static/oauth-authorization-code-grant.html
Questa procedura chiede il consenso all’utente (Ebay Seller Account).
Per maggiori info leggere:
https://developer.ebay.com/api-docs/static/oauth-consent-request.html
Per fortuna dall’account Developer viene generato un link, che una volta richiamato dall’Account Seller di Ebay richiede le sue credenziali per la conferma all’autorizzazione ( quelle del Seller Account Ebay).
Inserendo le credenziali del Seller Account Ebay, viene autorizzato il Client del Developer Account a leggere i suoi dati ( sempre quelli relativi all’account Seller Ebay).
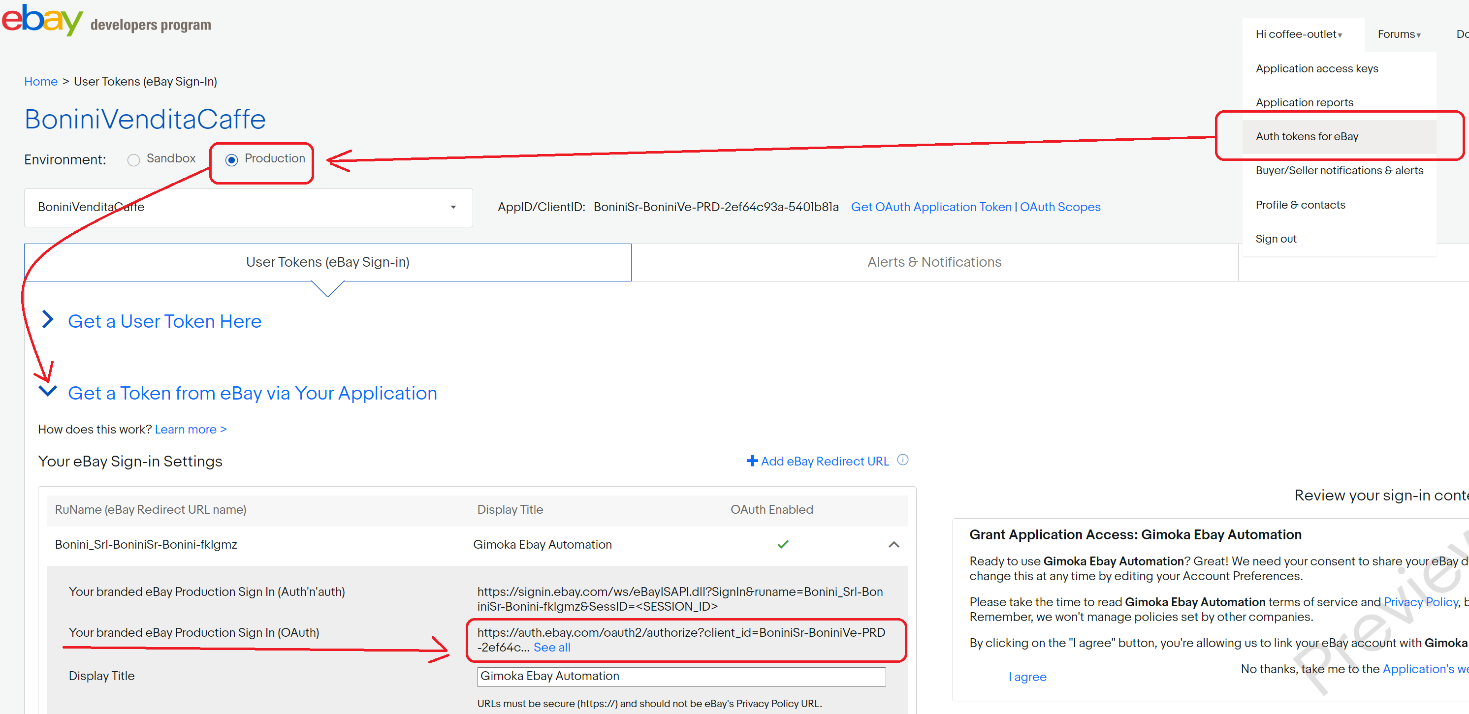
Per fare questo, cioè generare il link di Sign-In entrare nell’account developer andare nella sezione “Auth tokens for Ebay”:
Home > User Tokens (eBay Sign-In)
E cliccare su “Get a Token from eBay via Your Application”.
STEP 3 – Creazione RuName per creare un link di Sign-In - Getting your redirect_uri value
Vedi documentazione: https://developer.ebay.com/api-docs/static/oauth-redirect-uri.html
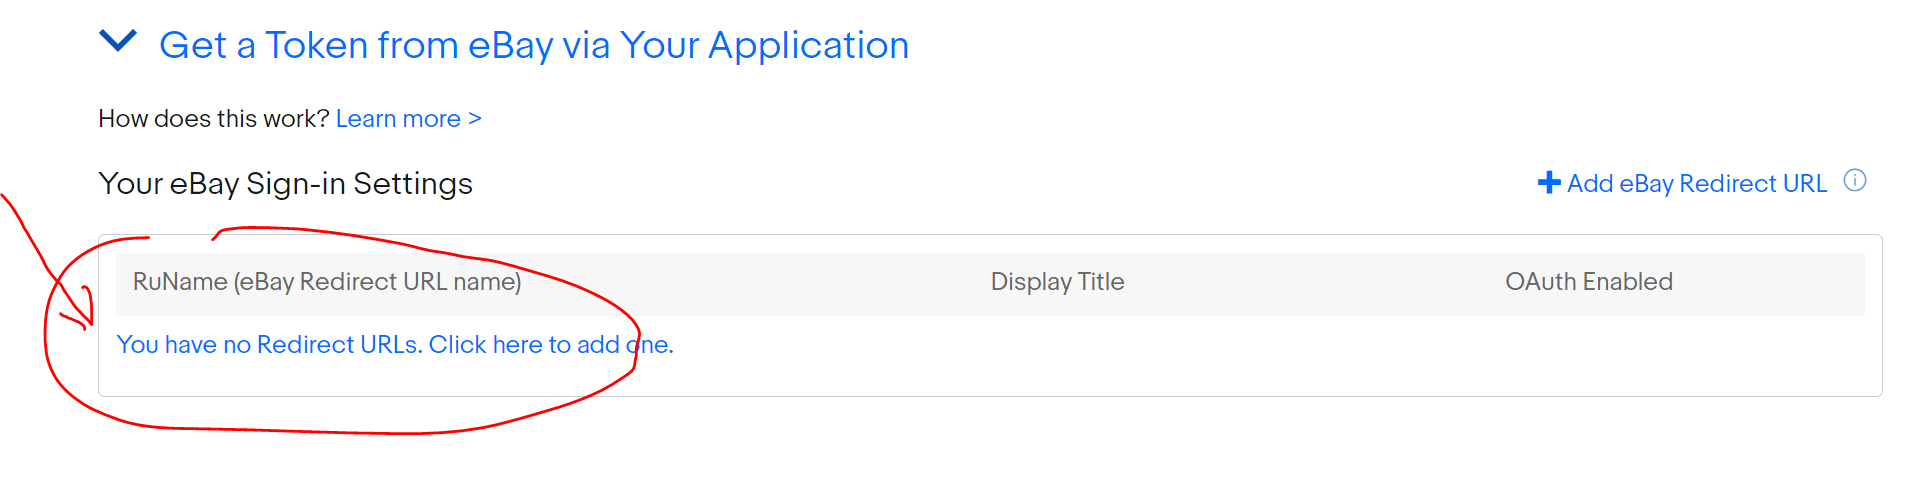
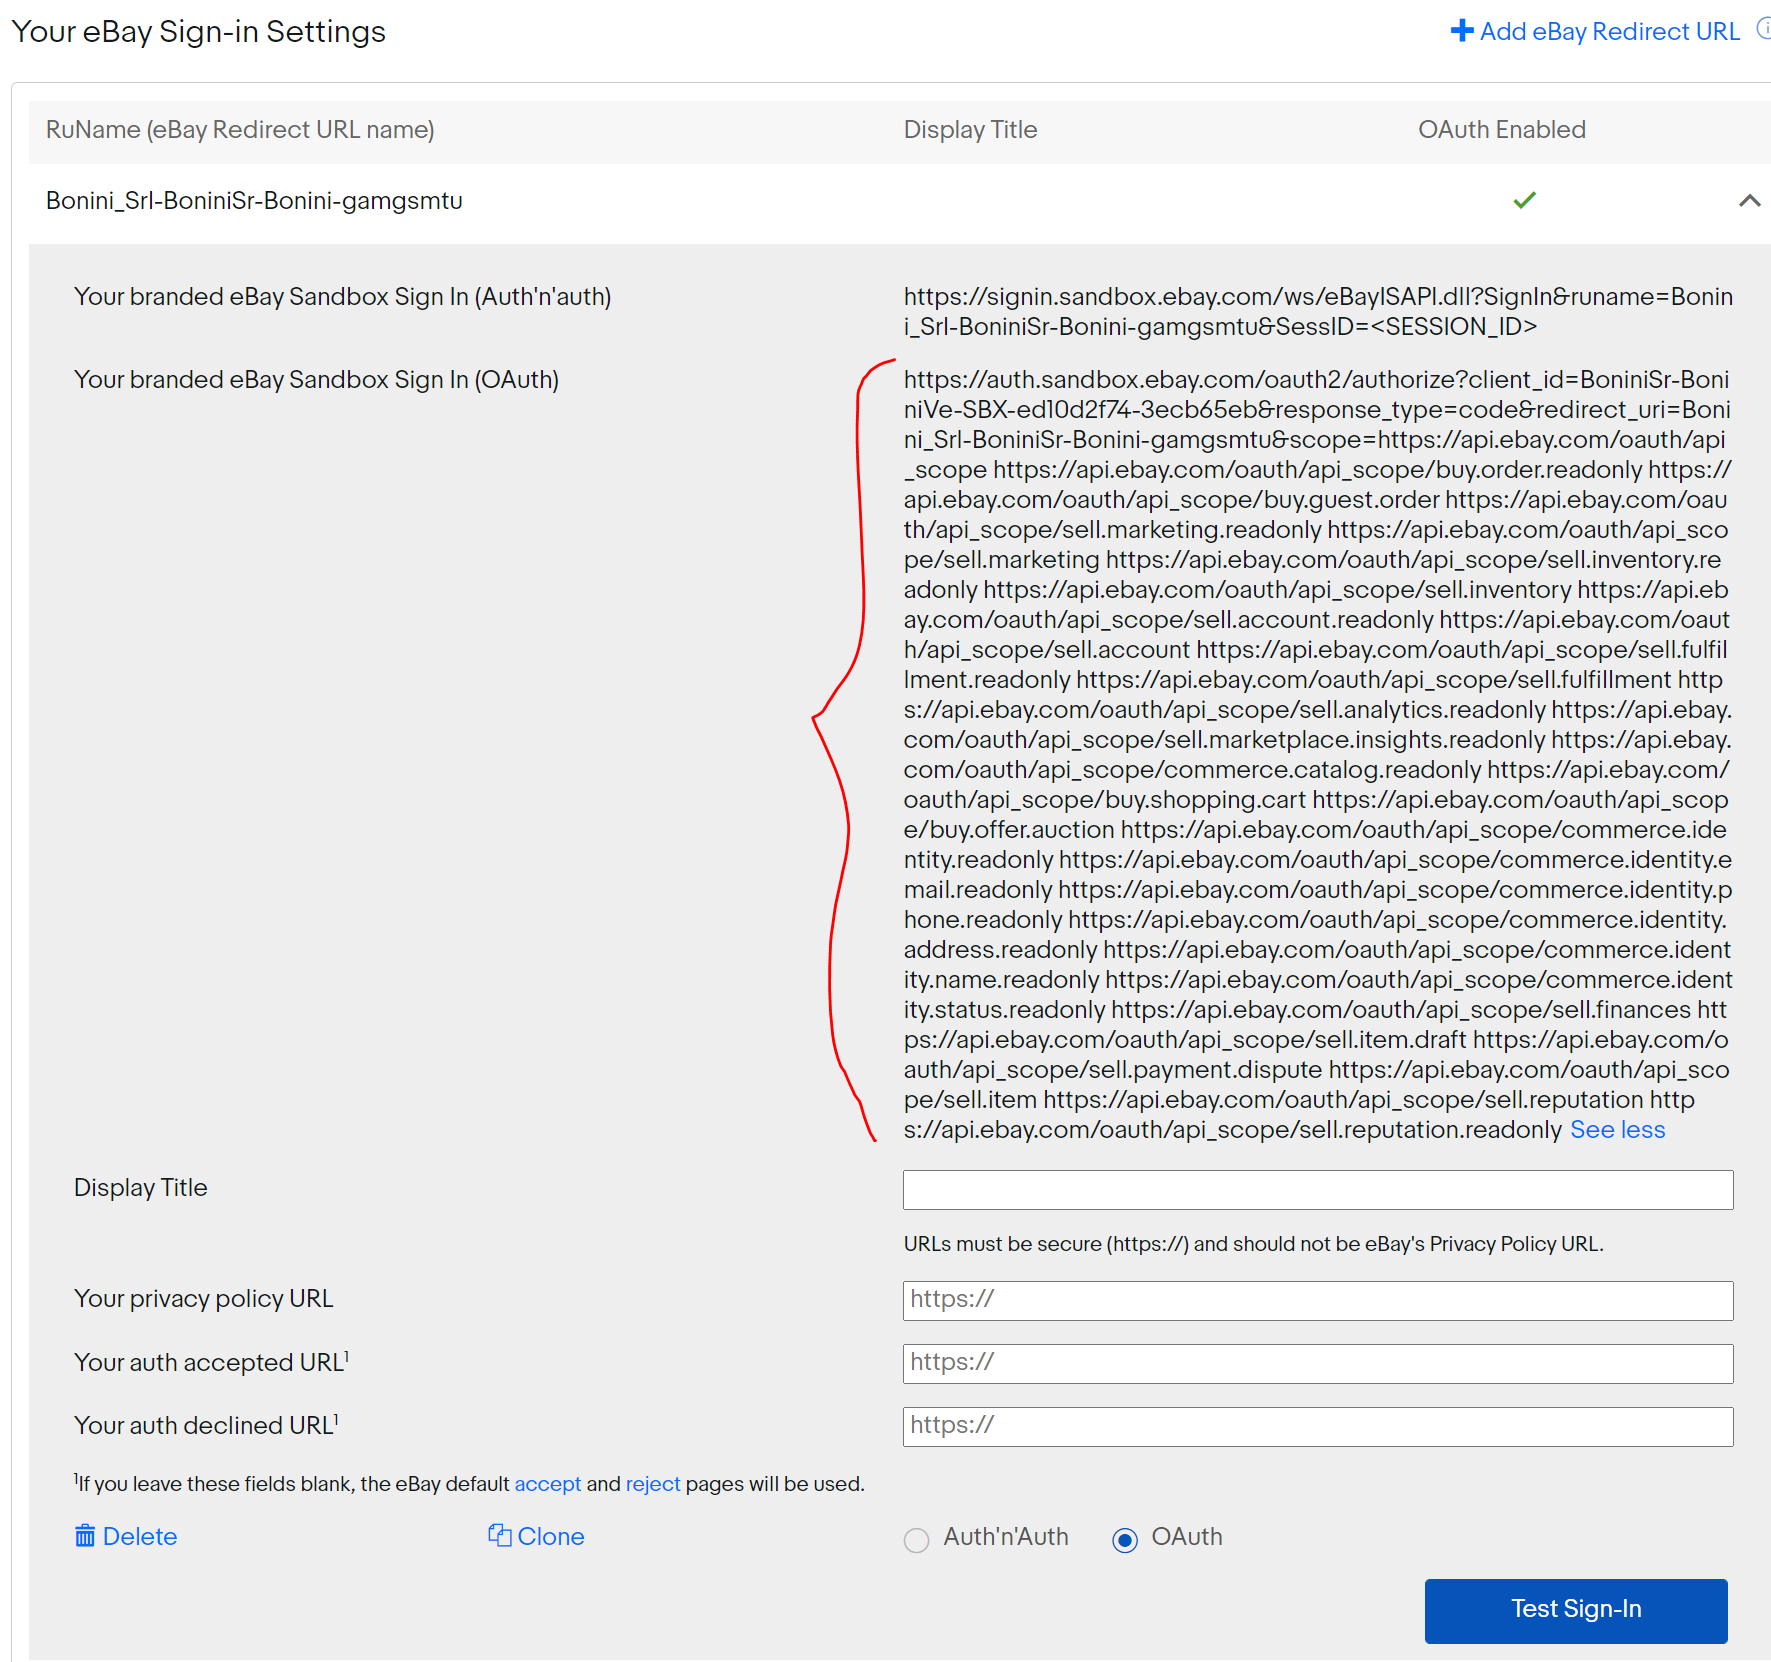
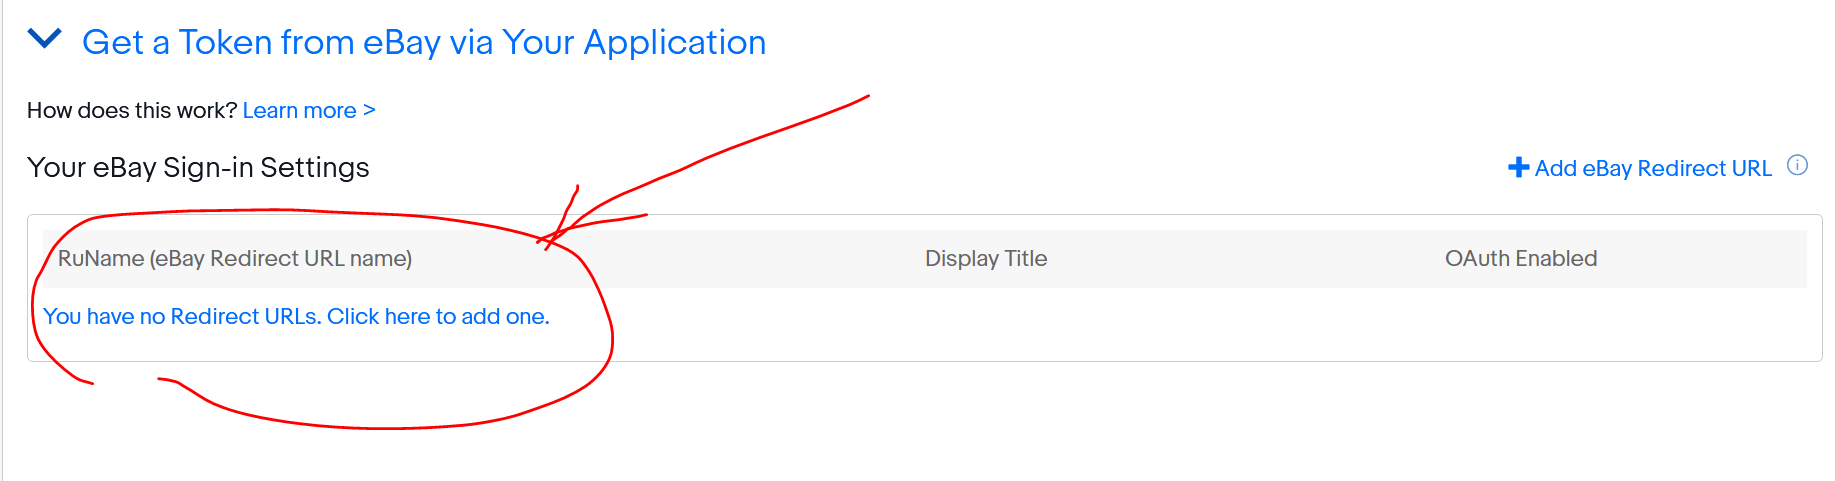
Una volta entrati nel sito Developer, aperto la pagina ed espanso il sotto-menu “Get a Token from eBay via Your Application” , cliccare su “Add eBay Redirect URL”
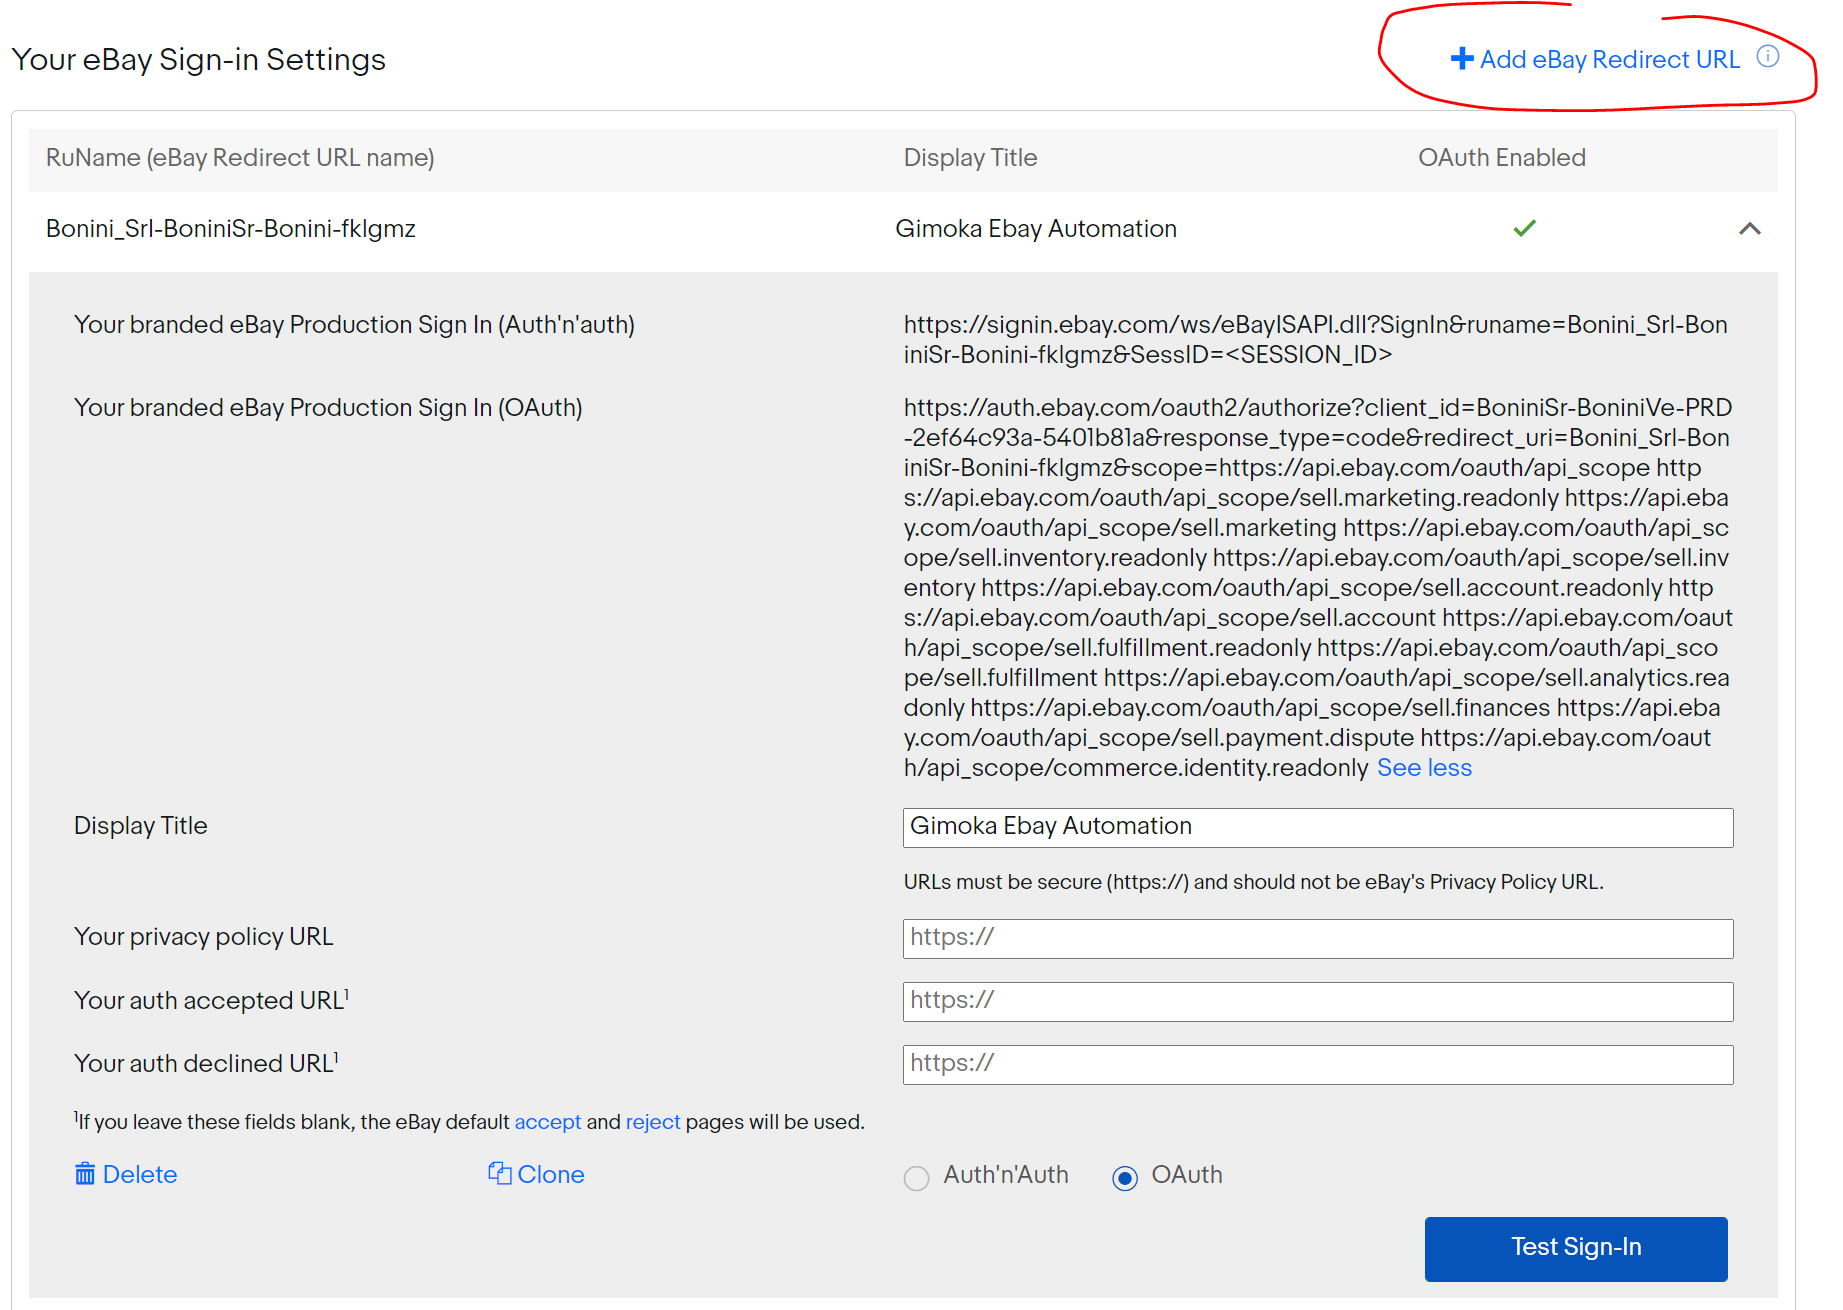
Oppure se non è mai stato richiesto uno, cliccare su “You have no Redirect URLs. Click here to add one”.
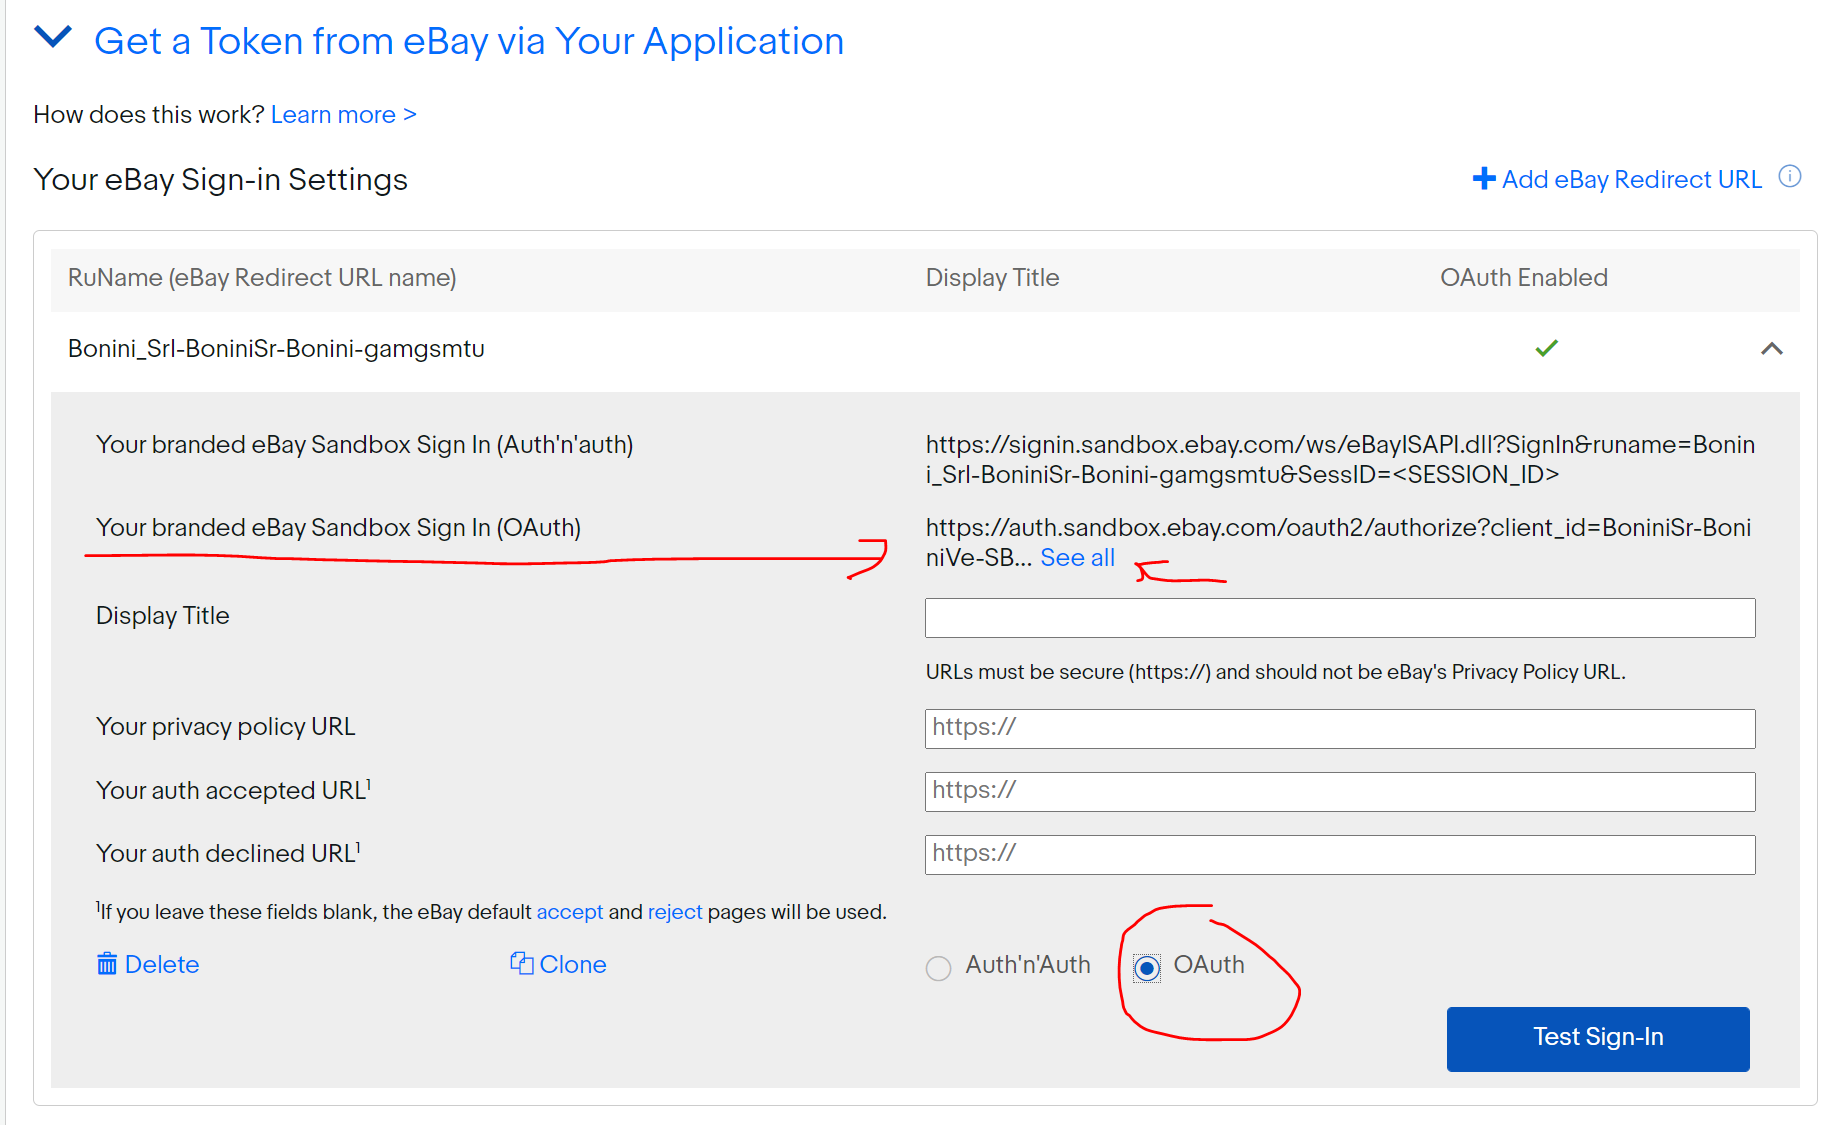
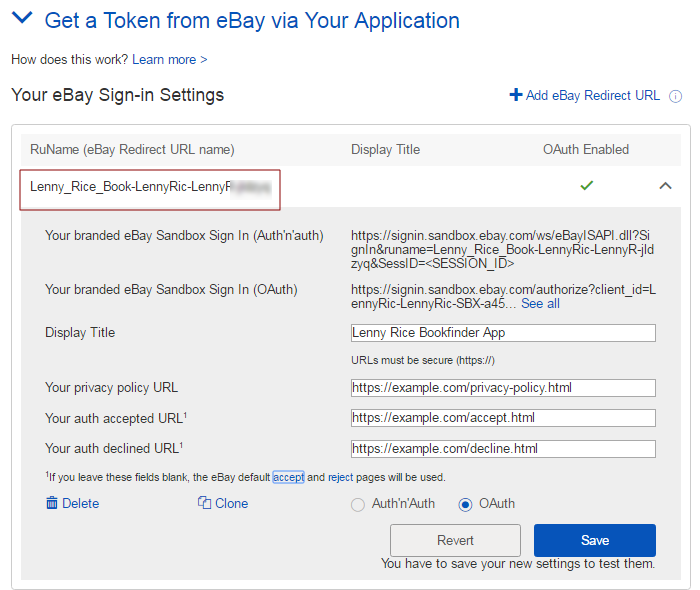
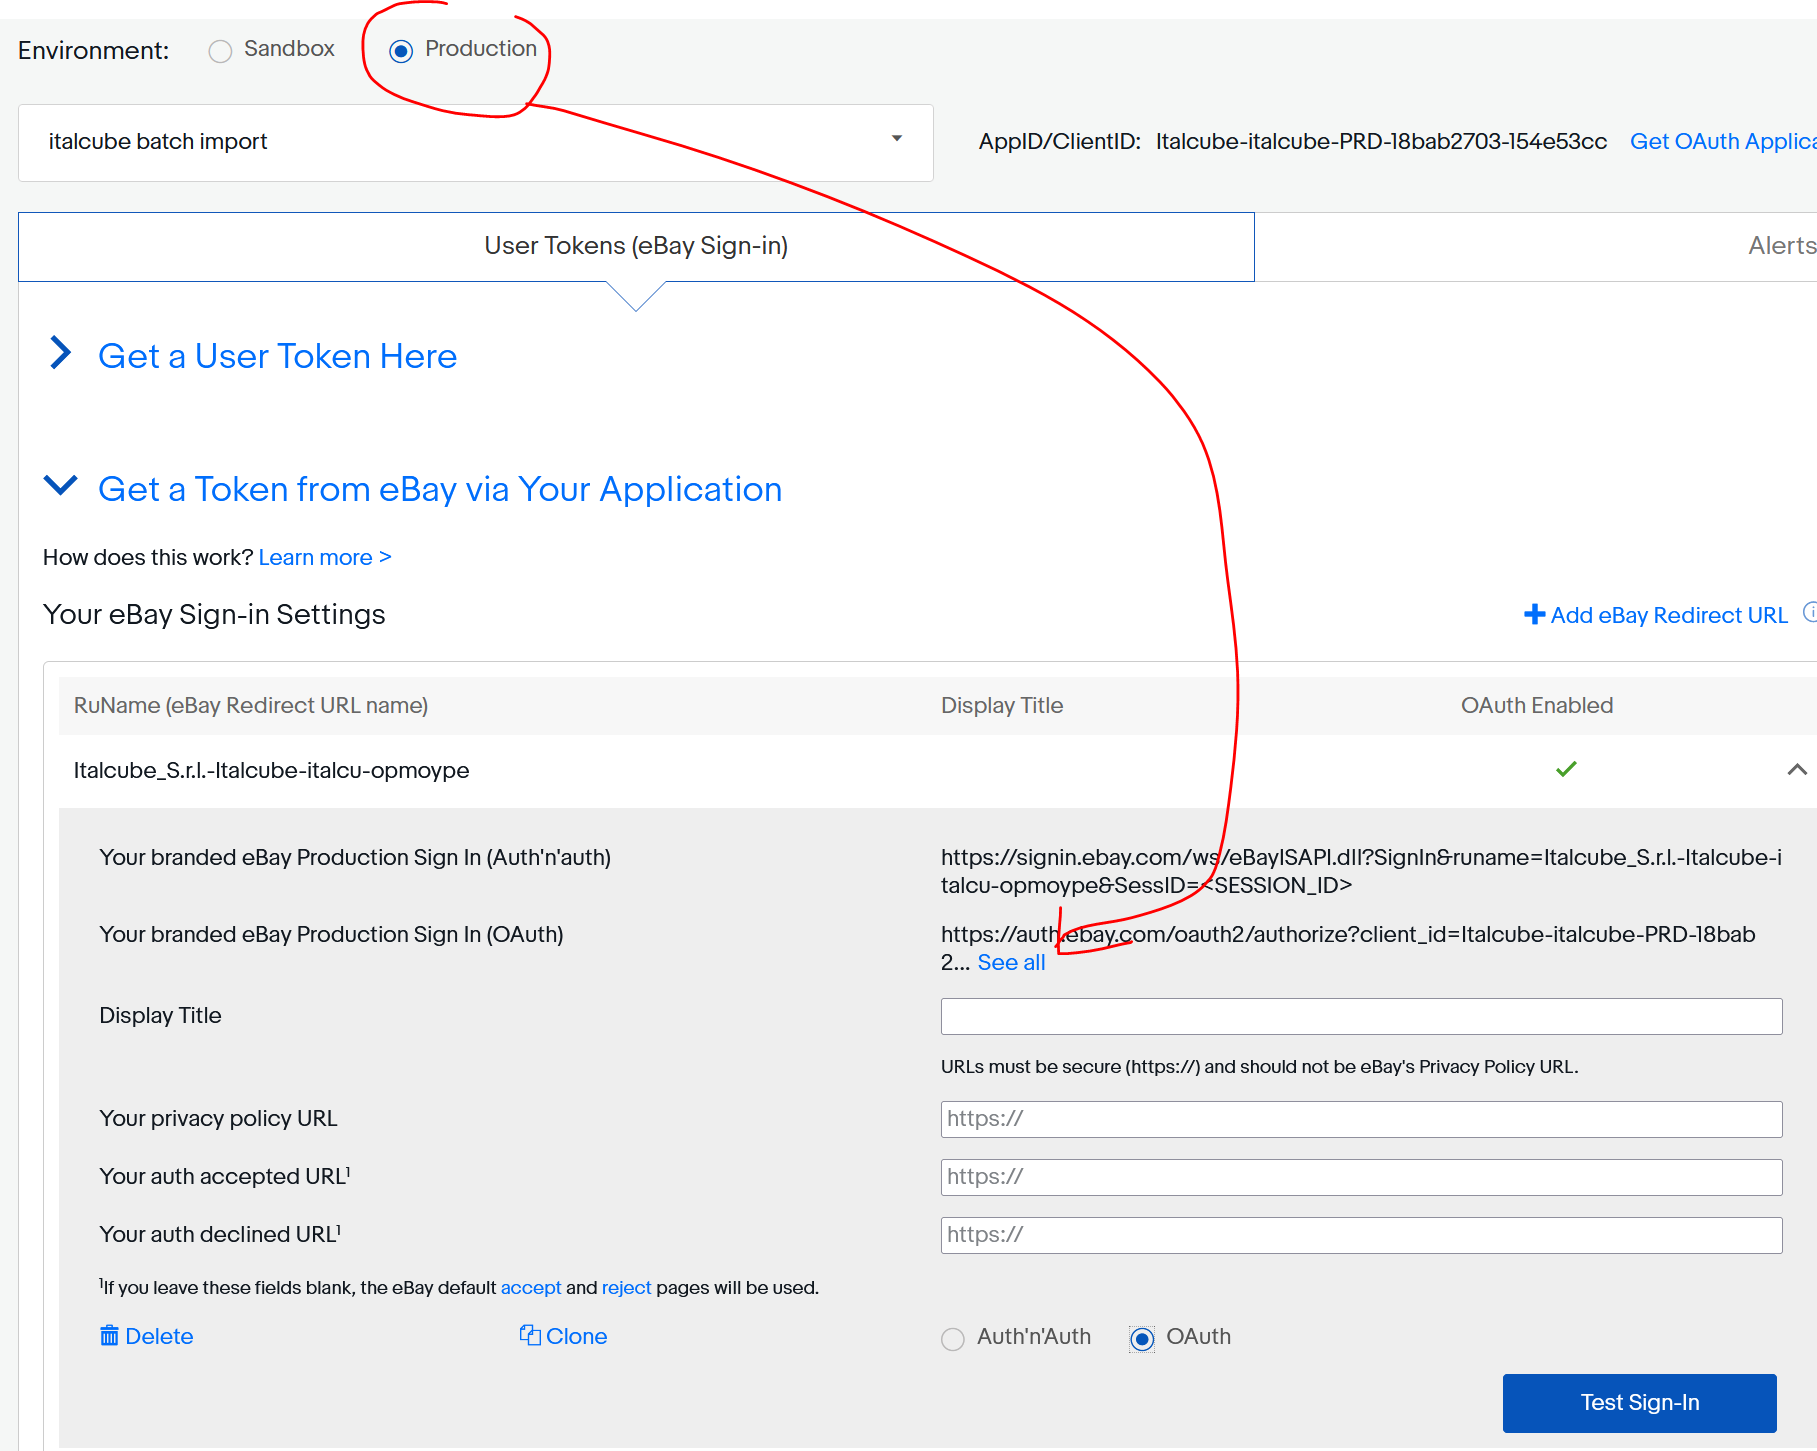
Appena premuto appare un form come immagine seguente. Cliccare su “OAuth” e poi confermare con il pulsante blu “Save”, nel caso del link creato per la “production”.
Vedi documentazione:
https://developer.ebay.com/api-docs/static/oauth-consent-request.html
STEP 4 – Testare il link di Sign-In
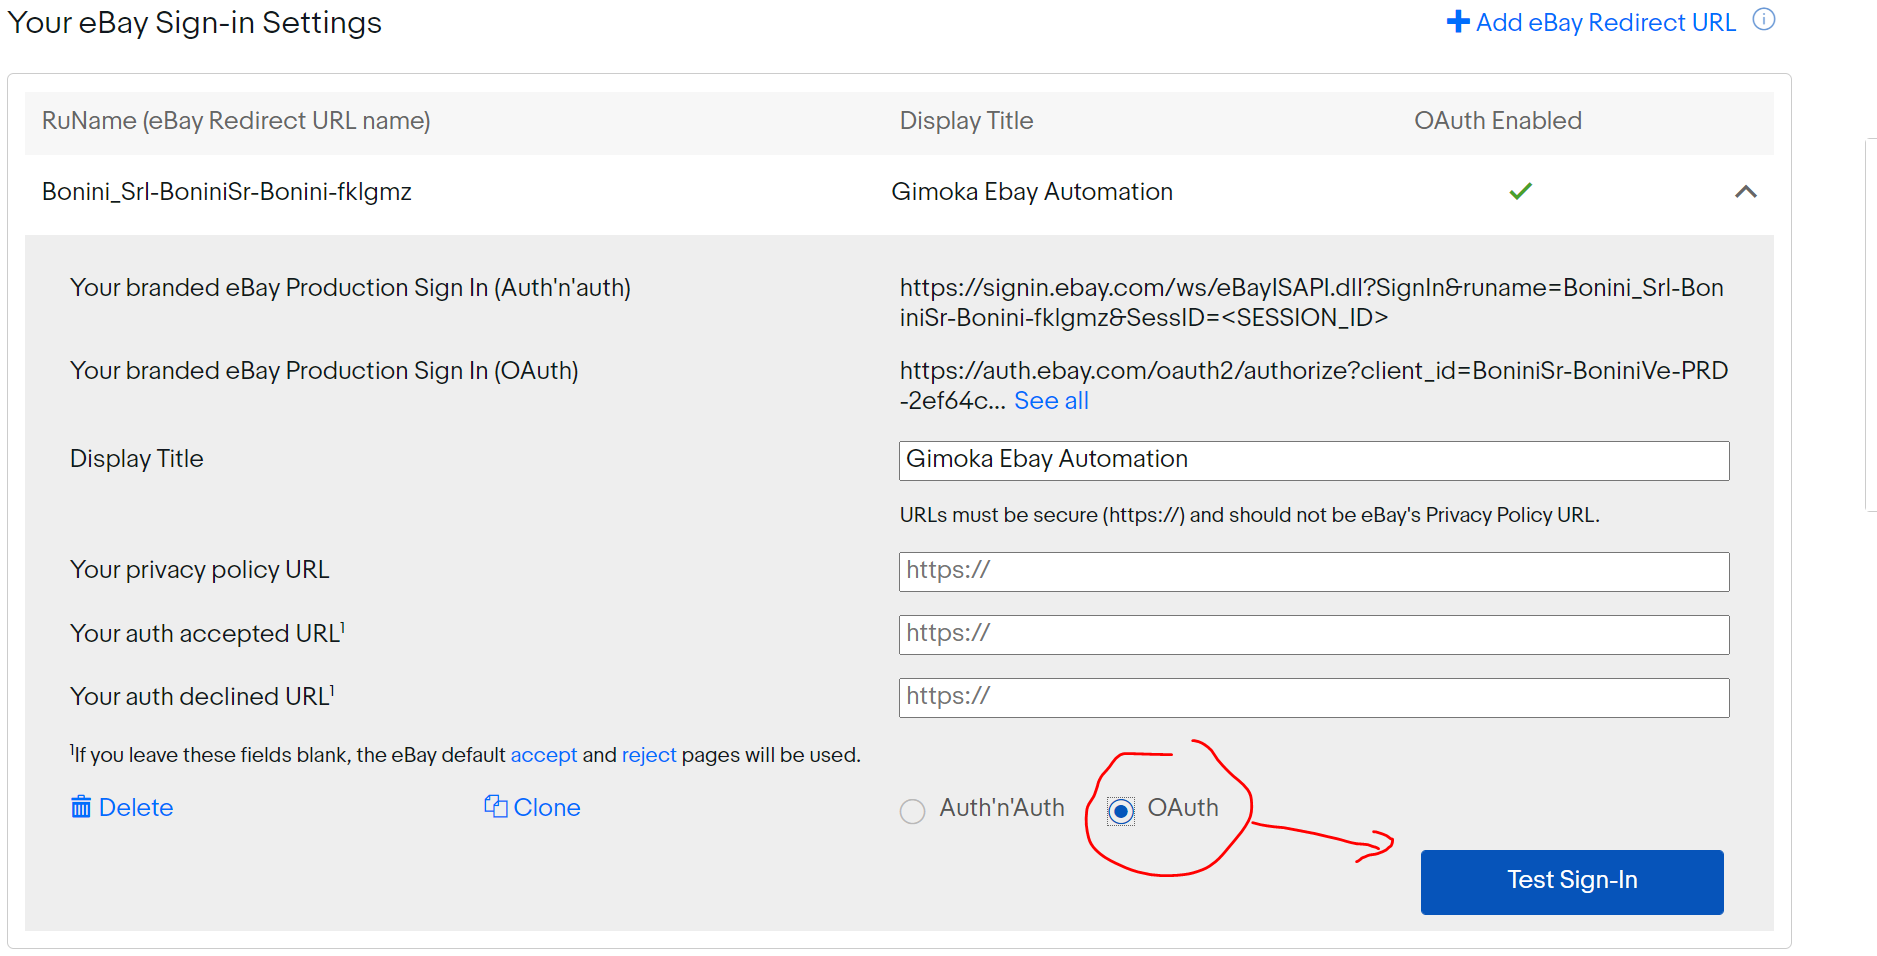
Selezionare “OAuth” e cliccare su “Test Sign-in”
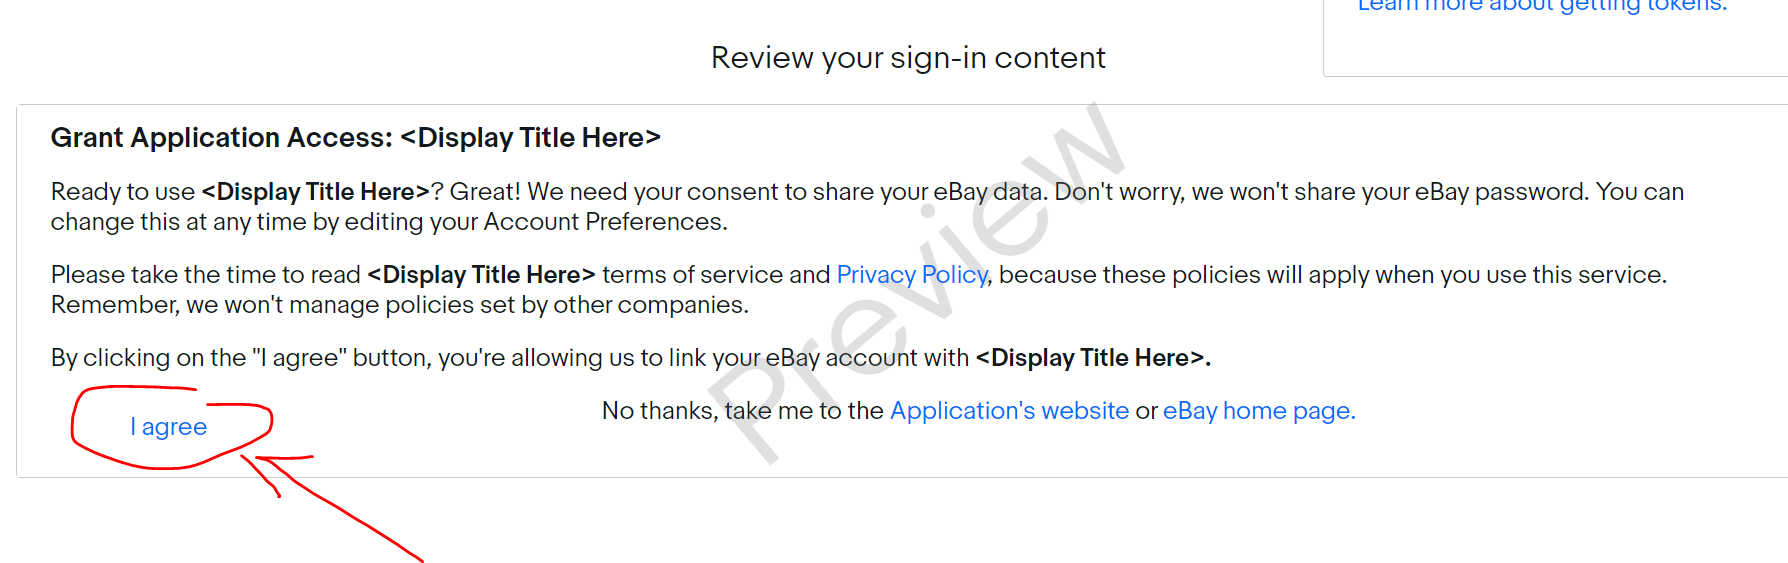
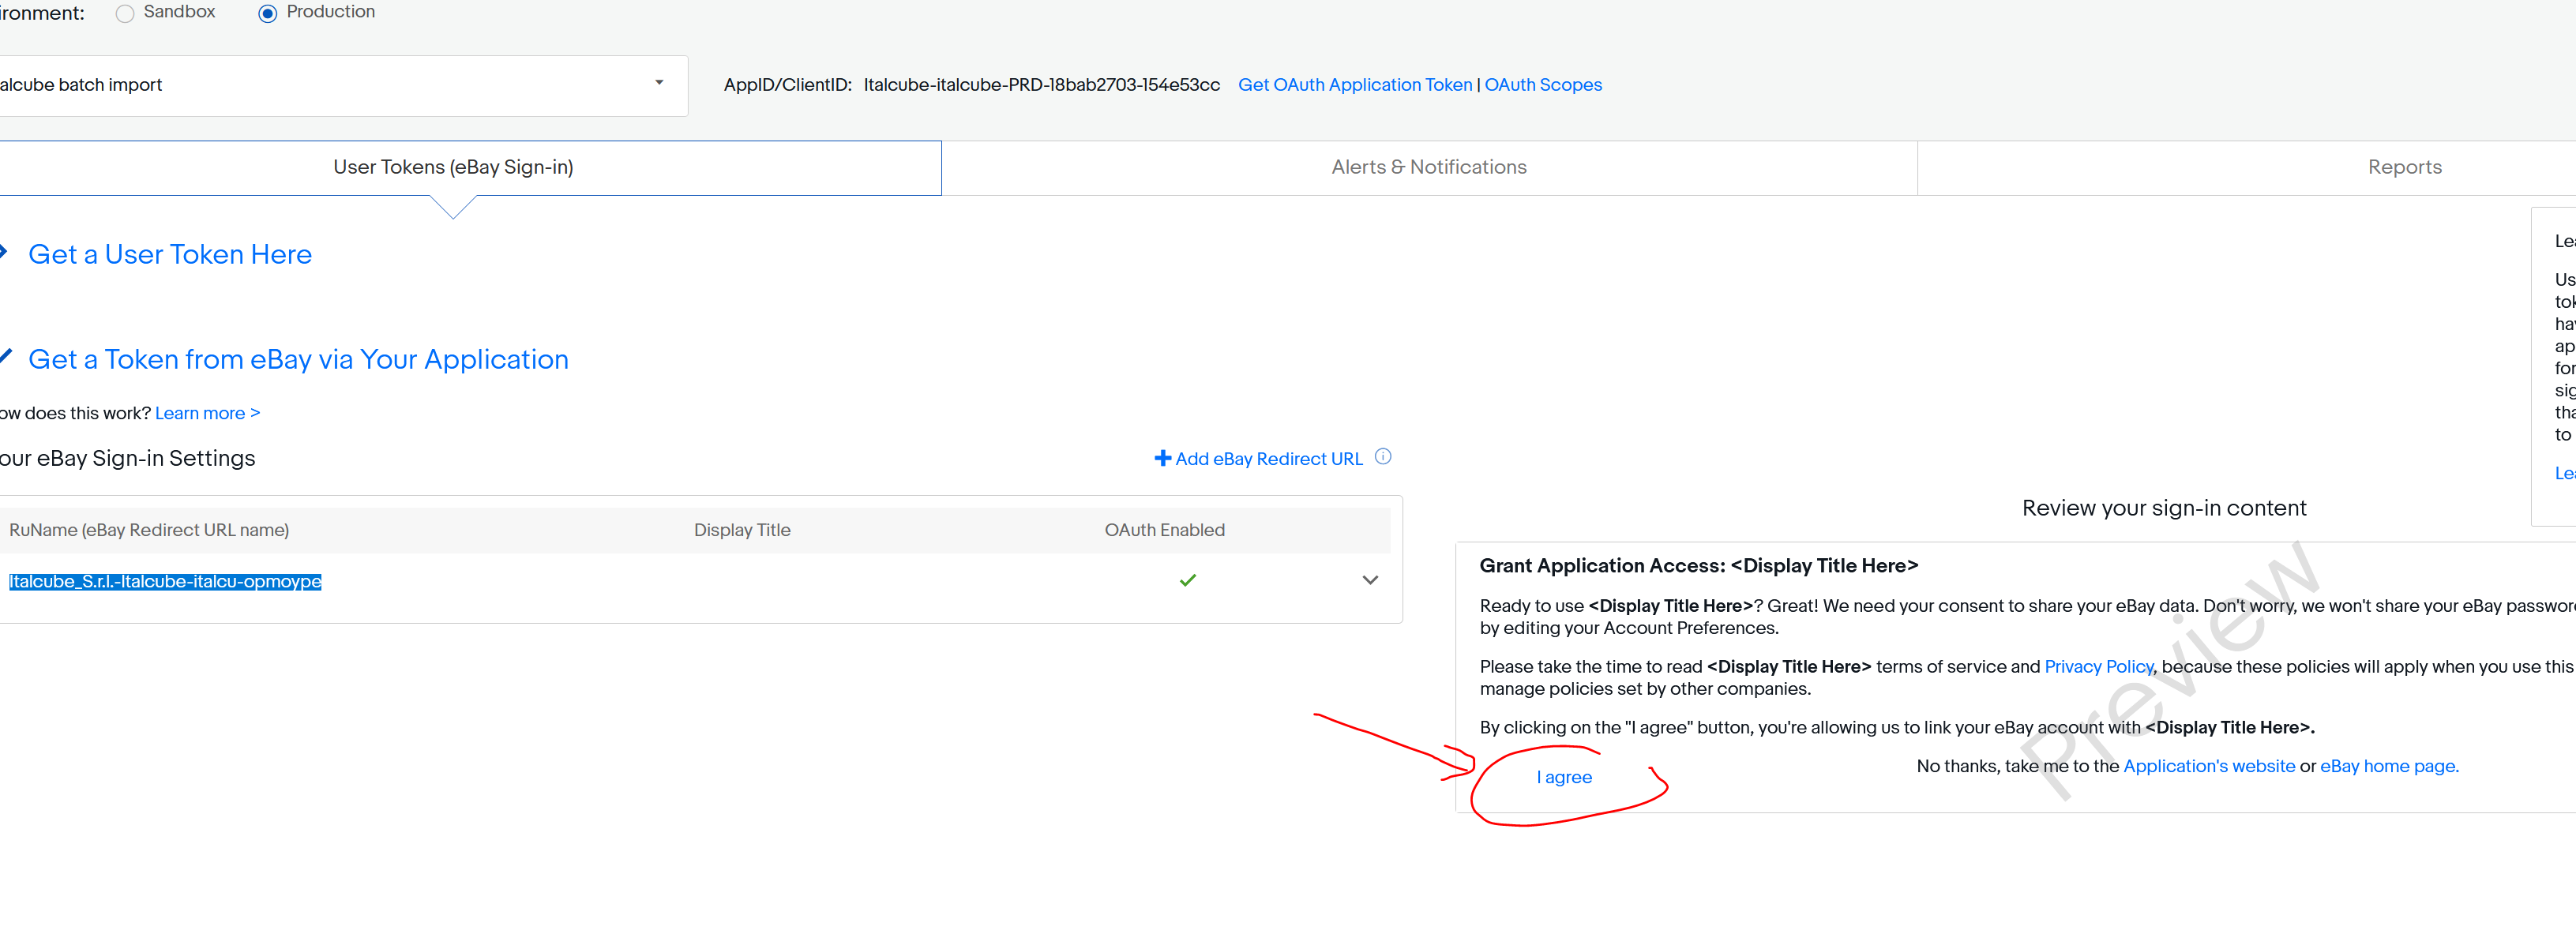
STEP 5 – Accettare il Sign-In content
Bisogna ricordarsi che nel sito developer, va accettata la pagina che verrà visualizzata usando il link di Sign-in. La Review mostra cosa verrà visualizzato all’utente Seller Ebay, quando gli verrà richiesto tramite il link di Sign-In l’autorizzazione ad usare i suoi dati da parte della App Developer.
STEP 6 – Aprire il link di autorizzazione (Sign-In) per la creazione del authorization code
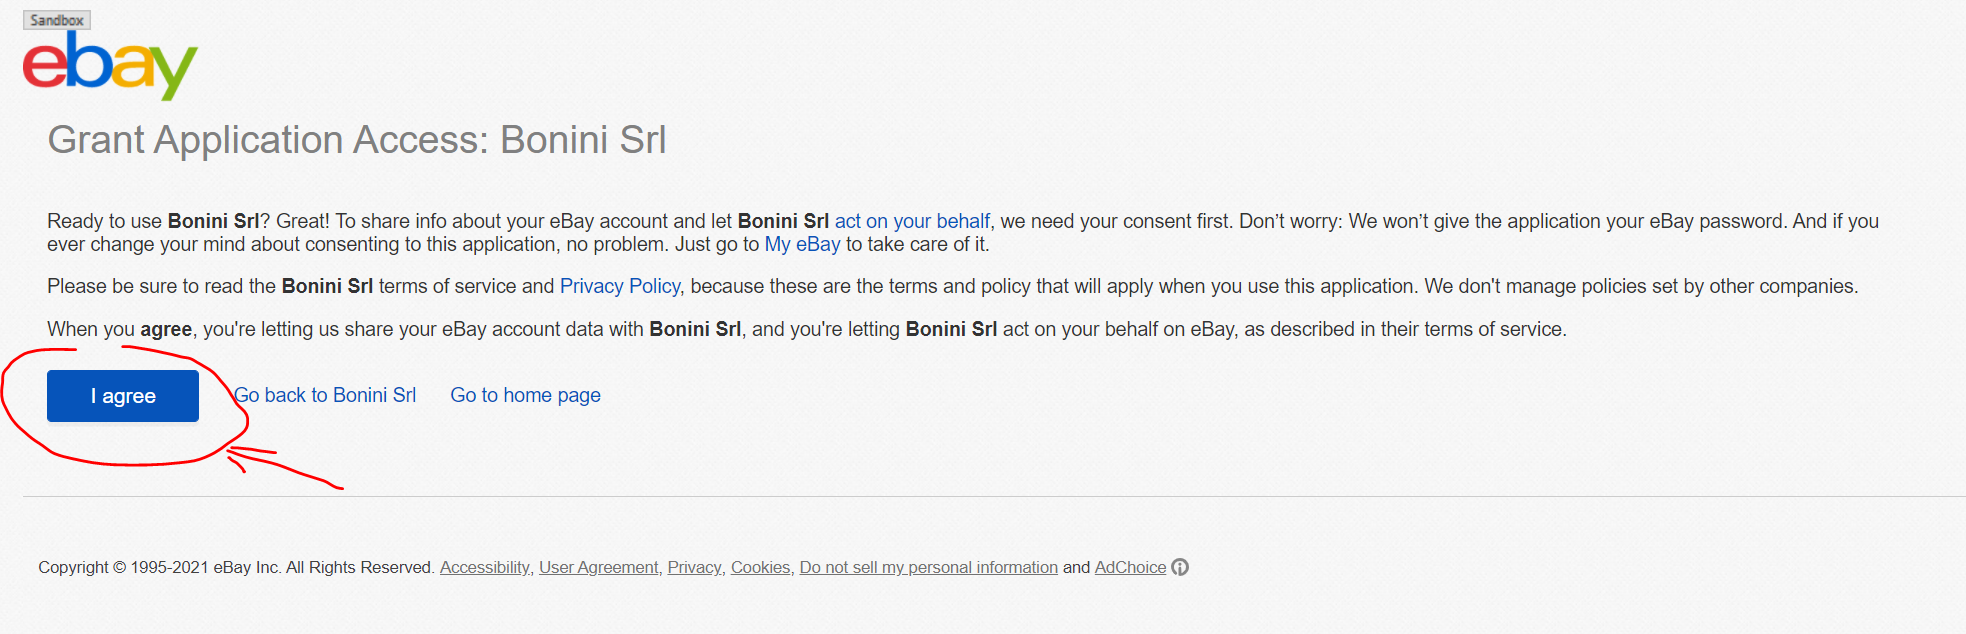
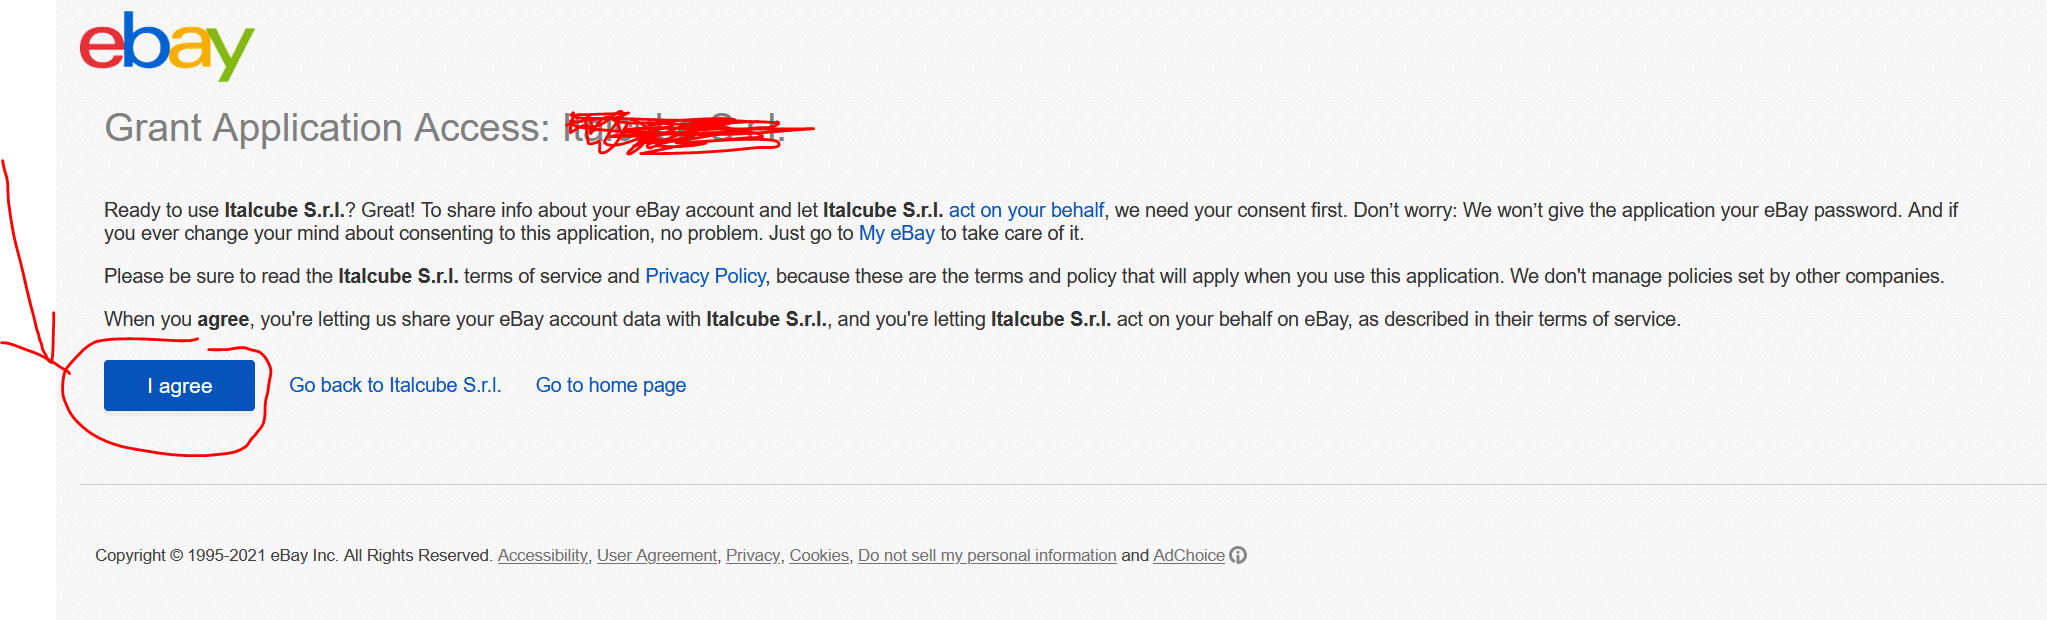
Cliccando su “Test Sign-In” oppure prendendo il link e mettendolo dentro il Browser. Appare la pagina di Login (usare le credenziali non developer ma quelle Seller) e poi come segue accettare “I agree” per autorizzare account developer.
Attenzione salvare questo Url dentro alla libreria, cosi da ricavare automaticamente lo “scope” che serve poi per richidere “access token”.
Lo scope fa parte dell’url come da immagine precedente. Esempio di scope:
https://api.ebay.com/oauth/api_scope https://api.ebay.com/oauth/api_scope/sell.marketing.readonly https://api.ebay.com/oauth/api_scope/sell.marketing https://api.ebay.com/oauth/api_scope/sell.inventory.readonly https://api.ebay.com/oauth/api_scope/sell.inventory https://api.ebay.com/oauth/api_scope/sell.account.readonly https://api.ebay.com/oauth/api_scope/sell.account https://api.ebay.com/oauth/api_scope/sell.fulfillment.readonly https://api.ebay.com/oauth/api_scope/sell.fulfillment https://api.ebay.com/oauth/api_scope/sell.analytics.readonly https://api.ebay.com/oauth/api_scope/sell.finances https://api.ebay.com/oauth/api_scope/sell.payment.dispute https://api.ebay.com/oauth/api_scope/commerce.identity.readonly
Tip: It's imperative that the scope value used in the refresh token request matches the scope value used in the consent request you made to get the refresh token for the user. If the scope values do not match, the User access token returned from the refresh token request will not be valid.
Lo scope andrà inviato nella chiamata con tutti gli URL di scope, separati da uno spazio.
Vedi documentazione:
https://developer.ebay.com/api-docs/static/oauth-consent-request.html
Dopo avere premuto “I agree” , l’utente Seller Ebay deve inserire le proprie credenziali.
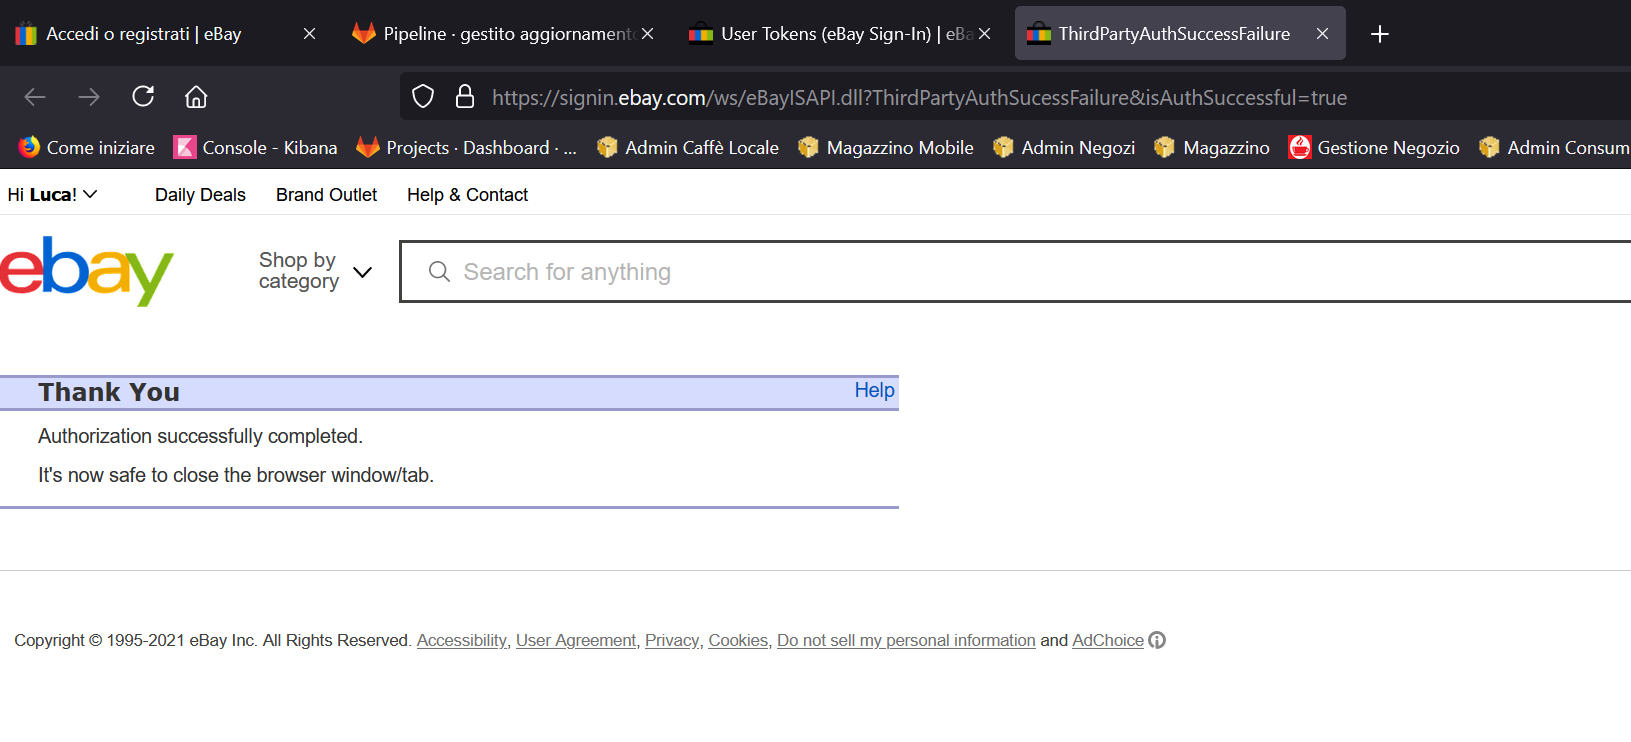
Dopo avere inserito le credenziali corrette si viene rediretti ad una pagina, dove nell’url in alto è presente authorization code.
Esempio:
https://signin.ebay.com/ws/eBayISAPI.dll?ThirdPartyAuthSucessFailure&isAuthSuccessful=true&code=v%5E1.1%23i%5E1%23f%5E0%23p%5E3%23r%5E1%23I%5E3%23t%5EUl41Xzc6OTAxMERFMTFFRDY4QUE5RjQyNkQ2MTBCQkNCOTk1RjFfMF8xI0VeMjYw&expires_in=299
La variabile “code” deve essere decodificata con il decode url.
Cercare su Google: “decode url online”
Vedi sito esempio:
https://meyerweb.com/eric/tools/dencoder/
Inserire v%5E1.1%23i%5E1%23f%5E0%23p%5E3%23r%5E1%23I%5E3%23t%5EUl41Xzc6OTAxMERFMTFFRDY4QUE5RjQyNkQ2MTBCQkNCOTk1RjFfMF8xI0VeMjYw
E cliccare su Decode.
Il risultato sarà come il seguente:
v^1.1#i^1#f^0#p^3#r^1#I^3#t^Ul41Xzc6OTAxMERFMTFFRDY4QUE5RjQyNkQ2MTBCQkNCOTk1RjFfMF8xI0VeMjYw
STEP 7 – Ricavare access token e il Refresh Token utilizzando authorization code
Exchanging the authorization code for a User access token
Vedi documentazione:
https://developer.ebay.com/api-docs/static/oauth-auth-code-grant-request.html
Dopo avere ottenuto il codice di autorizzazione “authorization code” ( variabile “code” della URL di risposta all’Url di Sign-in ), bisogna richiedere un “access token” .
In realtà insieme all’ “access token”, viene fornito un “refresh token” il quale servivare, con apposita richiesta a continuare a richiedere l’ “access token” utilizzato per fare le chiamate API.
Ricapitolando
Ottenere authorization code manualmente, richiamando URL di Sign-in, entrando con le credenziali Seller Account Ebay.
Vedi doc: https://developer.ebay.com/api-docs/static/oauth-credentials.html
Vedi doc: https://developer.ebay.com/api-docs/static/oauth-redirect-uri.html
Vedi doc: https://developer.ebay.com/api-docs/static/oauth-consent-request.html
Fare richiesta dell’ ”access token” usando authorization code.
Vedi doc: https://developer.ebay.com/api-docs/static/oauth-auth-code-grant-request.html
Dati necessari per la chiamata per richiedere un “access token” da un “authorization code”:
HTTP method: POST
URL (Sandbox): https://api.sandbox.ebay.com/identity/v1/oauth2/token
HTTP headers:
Content-Type = application/x-www-form-urlencoded
Authorization = Basic <B64-encoded-oauth-credentials>
Request body:
grant_type=authorization_code
code=<authorization-code-value>
redirect_uri=<RuName-value>
Esempio curl per richiedere un “access token” da un “authorization code”:
curl -X POST 'https://api.sandbox.ebay.com/identity/v1/oauth2/token' \
-H 'Content-Type: application/x-www-form-urlencoded' \
-H 'Authorization: Basic RGF2eURldmUtRG2 ... ZTVjLTIxMjg=' \
-d 'grant_type=authorization_code&
code=v%5E1.1%23i%5E1%23f% ... 3D%3D&
redirect_uri=Davy_Developer-DavyDeve-DavysT-euiukxwt'
Esempio di risultato:
{
"access_token": "v^1.1#i^1#p^3#r^1...XzMjRV4xMjg0",
"expires_in": 7200,
"refresh_token": "v^1.1#i^1#p^3#r^1...zYjRV4xMjg0",
"refresh_token_expires_in": 47304000,
"token_type": "User Access Token"
}
Salvare il “refresh token”, che verrà utilizzato dalla Libreria Ebay per ottenere nuovi ”access token”.
Vedi doc: https://developer.ebay.com/api-docs/static/oauth-refresh-token-request.html
Esempio dati per richiedere un “access token” da un “refresh token”:
HTTP method: POST
URL (Sandbox): https://api.sandbox.ebay.com/identity/v1/oauth2/token
HTTP headers:
Content-Type = application/x-www-form-urlencoded
Authorization = Basic <B64-encoded-oauth-credentials>
Request body:
grant_type=refresh_token
refresh_token=<your-refresh-token-value>
scope=<scopeList> // a URL-encoded string of space-separated scopes
Esempio curl per richiedere un “access token” da un “refresh token”:
curl -X POST 'https://api.sandbox.ebay.com/identity/v1/oauth2/token' \
-H 'Content-Type: application/x-www-form-urlencoded' \
-H 'Authorization: Basic RGF2eURldmUtRG2 ... ZTVjLTIxMjg=' \
-d 'grant_type=refresh_token&
refresh_token=v^1.1#i^1#p^3# ... fMSNFXjEyODQ=&
scope=https://api.ebay.com/oauth/api_scope/sell.account%20
https://api.ebay.com/oauth/api_scope/sell.inventory'
Esempio risposta della chiamata per la richiesta di access token
{
"access_token": "v^1.1#i ... AjRV4yNjA=",
"expires_in": 7200,
"token_type":"User Access Token"
}
SCHERMATE CREAZIONE REFRESH TOKEN
Creazione RuName e impostazione dato nel DB
Entro dentro al sito: https://developer.ebay.com , usando le credenziali.
Entra nel Menu “Auth tokens for eBay”
Clicca su “You have no Redirect URLs, Click here to add one”.
Una volta cliccato, aspettare l’esecuzione della creazione link di “Sign-In”. Cliccare su “see all” e selezionarlo.
Ricordarsi anche si cliccare su “I agree” nel form a fianco
Dopo avere premuto “I agree” apparirà la seguente schermata
Richiamare Url di Signi-In per un nuovo “Authorization Code”
Una volta selezionato Url di Sign-In, chiamarlo da Chrome.
Esempio link:
https://auth.ebay.com/oauth2/authorize?client_id=Italcube-italcube-PRD-18bab2703-154e53cc&response_type=code&redirect_uri=Italcube_S.r.l.-Italcube-italcu-opmoype&scope=https://api.ebay.com/oauth/api_scope https://api.ebay.com/oauth/api_scope/sell.marketing.readonly https://api.ebay.com/oauth/api_scope/sell.marketing https://api.ebay.com/oauth/api_scope/sell.inventory.readonly https://api.ebay.com/oauth/api_scope/sell.inventory https://api.ebay.com/oauth/api_scope/sell.account.readonly https://api.ebay.com/oauth/api_scope/sell.account https://api.ebay.com/oauth/api_scope/sell.fulfillment.readonly https://api.ebay.com/oauth/api_scope/sell.fulfillment https://api.ebay.com/oauth/api_scope/sell.analytics.readonly https://api.ebay.com/oauth/api_scope/sell.finances https://api.ebay.com/oauth/api_scope/sell.payment.dispute https://api.ebay.com/oauth/api_scope/commerce.identity.readonly
Inserire le credenziali dall’account Ebay Seller come da immagine:
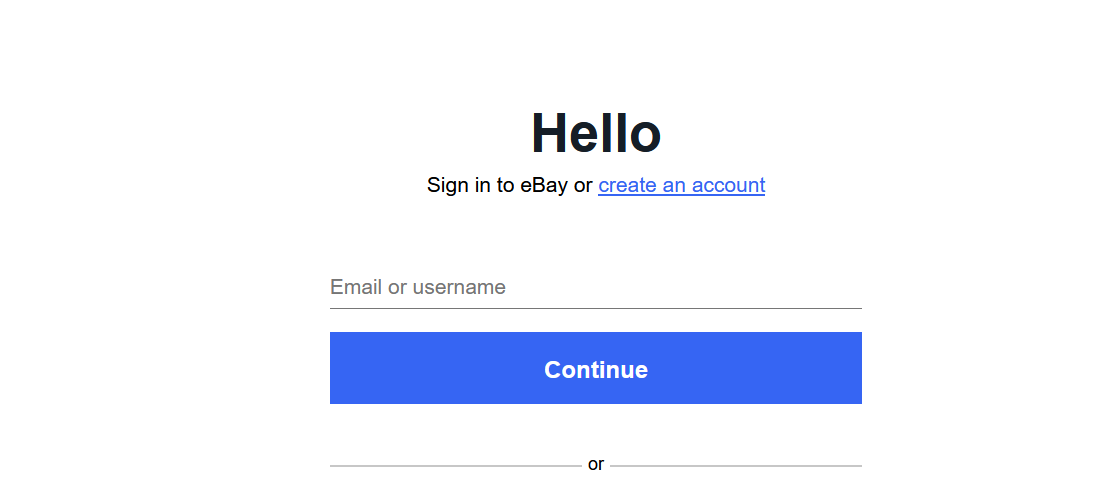
Una volta entrati (perché si è inserito le credenziali giuste), cliccare su “I Agree”
Dopo avere premuto apparirà la seguente schermata. Prelevare Url che contiene il codice di autorizzazione. Authorization Code = variabile code.
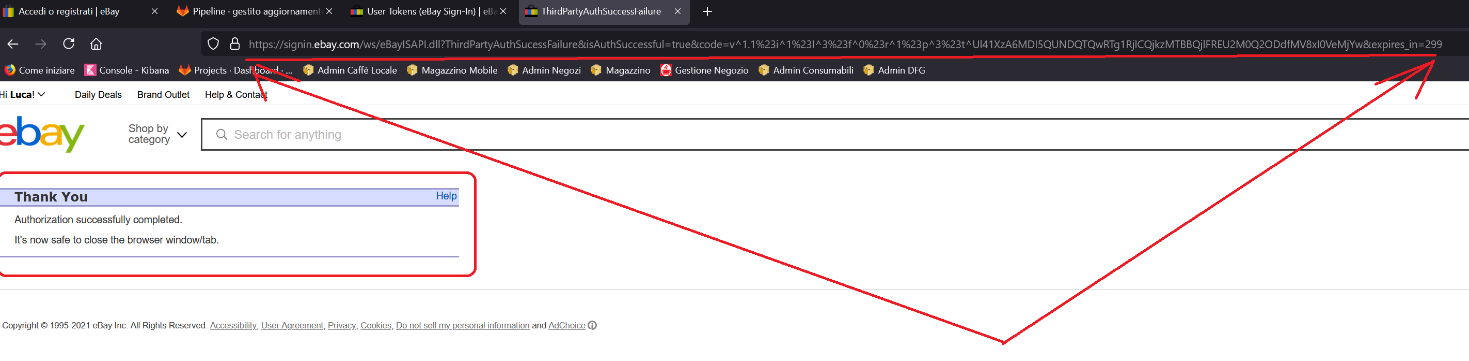
Come evidenziato prendere url e memorizzarlo

Esempio Url:
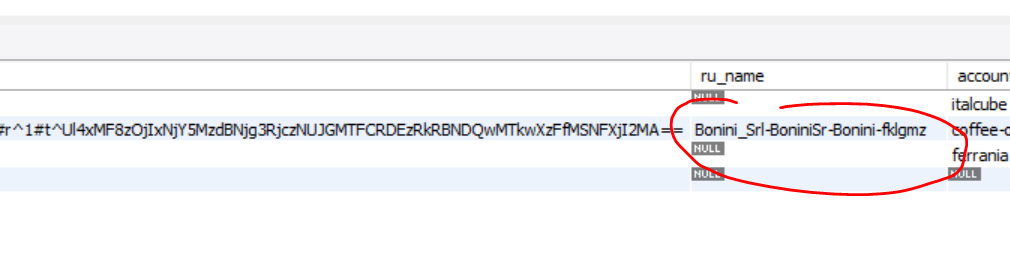
Impostare il RuName dentro al DB per l’account desiderato (se non è già impostato)
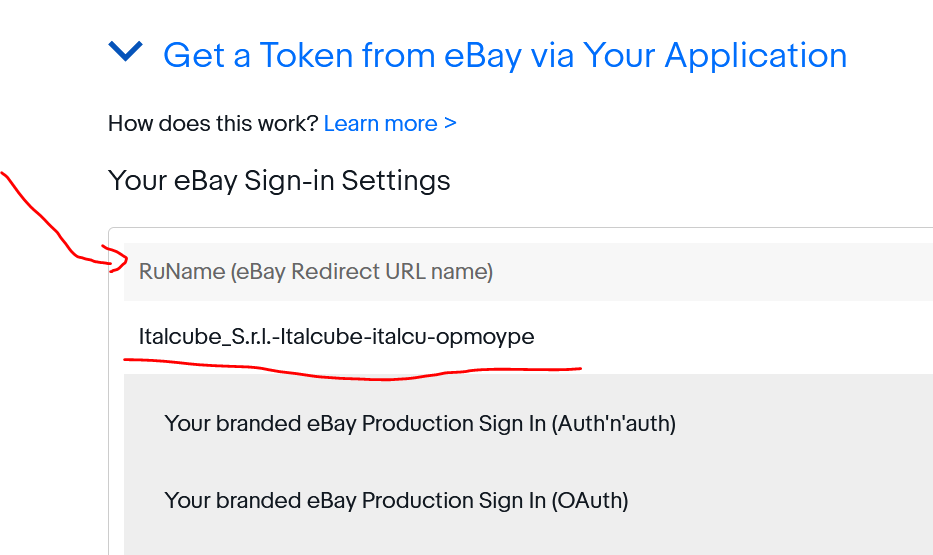
In questo esempio: Italcube_S.r.l.-Italcube-italcu-opmoype
Selezionare gli account Ebay sul DB e impostare il RuName sul record corretto.
SELECT * FROM ebay.account;
Creare/Aggiornare il Refresh Token con la Libreria a partire dall’Url risposta
Impostare Url dentro alla Libreria-Ebay come da immagine:
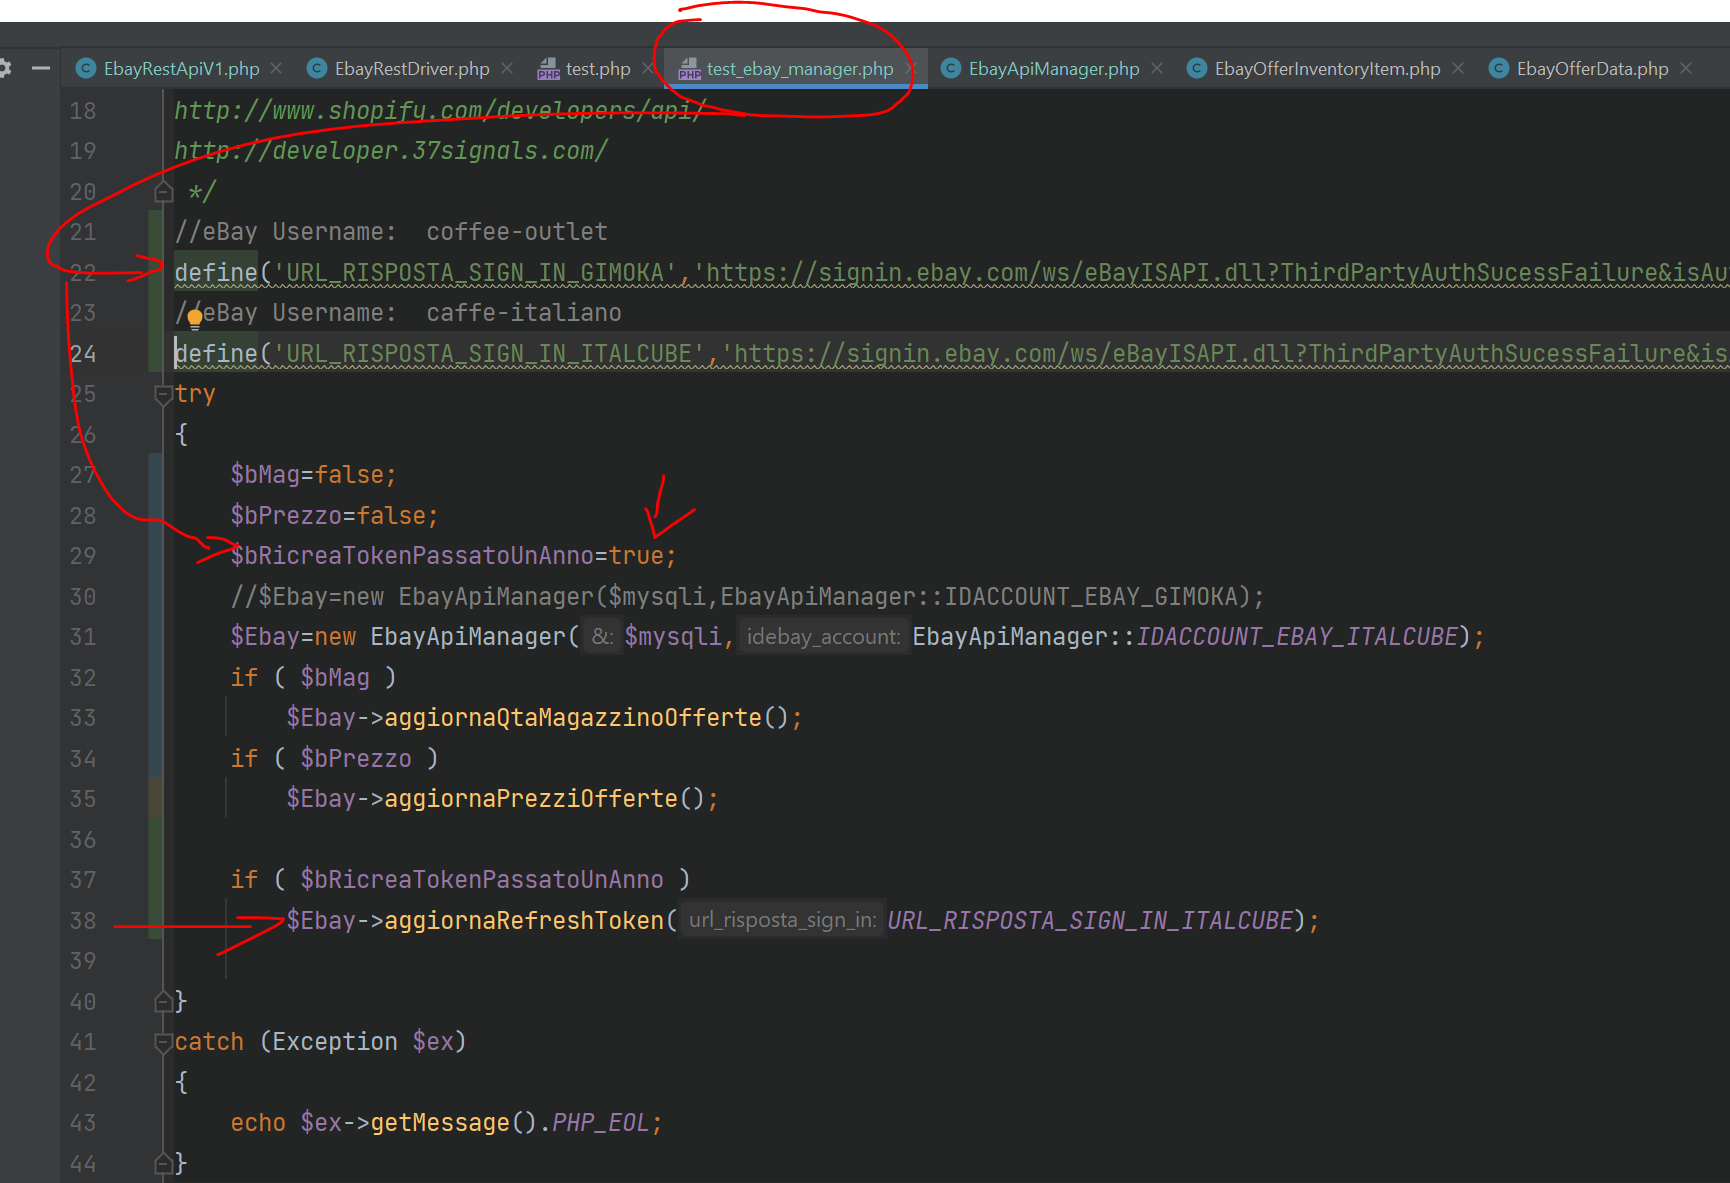
Una volta impostato dichiarare che si vuole creare il Refreh Token ed eseguire lo script
ATTENZIONE: se il refresh token si perde o scade, o viene dichiarato non valido…va rifatto tutto a partire dal punto 6 : “Una volta selezionato Url di Sign-In, chiamarlo da Chrome”